![]()
Art Classes
Instructional DVDs
Art Tips
Step by Step
|
| Home | Main | Links | Site Map | Classroom |
Art Tips
Protecting the Final Painting
Why do you need to protect an acrylic painting? Acrylic paints have up to 13 (or more) ingredients, including biocides, anti-foaming agents, binders, water, and pigments. When drying, some of these ingredients evaporate leaving “holes” in their place, which makes a nice surface for the next coat to “latch” on to. The problem, however, is that when an acrylic painting is dry there are these microscopic “tunnels” or “holes” that provide a path for undesirable external elements like dust, smoke, or humidity to migrate through. To make matters worse, an unprotected acrylic painting has the characteristic of building up a static charge - which will actually attract unwanted particles to its surface!
 To
combat the risks of damage to a signed painting, as well as to bring out
the vibrancy of the paint colors, the first thing I do is coat the
finished painting with 3-6 coats of a gloss medium. Each coat is thinned
with no more than 25% water (1/4 water to 3/4 gloss medium). These coats
can be brushed on, but I prefer to spray them on with a small touch-up
gun. However, gloss medium itself has much of the same ingredients as
the paint does, except for pigment (it dries clear). Therefore its
finished state also has these “tunnels” running through it.
To
combat the risks of damage to a signed painting, as well as to bring out
the vibrancy of the paint colors, the first thing I do is coat the
finished painting with 3-6 coats of a gloss medium. Each coat is thinned
with no more than 25% water (1/4 water to 3/4 gloss medium). These coats
can be brushed on, but I prefer to spray them on with a small touch-up
gun. However, gloss medium itself has much of the same ingredients as
the paint does, except for pigment (it dries clear). Therefore its
finished state also has these “tunnels” running through it.
So the next thing I do is seal the painting from external elements using a final varnish.
VERY IMPORTANT: Any acrylic paint (including the final gloss medium coats), needs to cure for at least 72 hours (three days) before you can apply the final varnish.
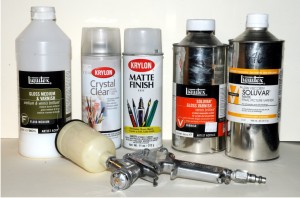
There are a variety of varnish manufacturers on the market, but the two I am most familiar with are Liquitex® (which makes Soluvar®) and Krylon®. Both companies offer final varnishes in matte or gloss finishes, but Krylon comes in a spray can, while Soluvar comes in a liquid form. Being a liquid, you are able to combine the two types of Soluvar finishes (matte and gloss) to make a third option - satin, in varying degrees - something you could not achieve with a spray can. Another thing to be aware of is the archival quality offered by a product like Soluvar, as well as the ability to remove it, should the need arise.
There are instances where a portable spray varnish is needed to seal a painting (e.g. while away from home at an exhibition), so I’ll use one of the Krylon products. However, it should be noted that the solvent required to remove Krylon (if required) also removes acrylic. So sanding it off would be the only option. In contrast, you can remove Soluvar with mineral spirits or turpentine - neither of which is harsh enough to react adversely with acrylic.
To apply Soluvar, I thin it with mineral spirits, using a 25% thinner to 75% Soluvar mix. Again, I spray it through a small touch-up spray gun (mine holds 5 fl oz / 150ml), in a well ventilated area. Make sure to use a breathing mask. One coat is usually enough, but that one coat involves two passes. The first pass is applied starting from the top and working down to the bottom of the painting. Then, after rotating the painting 90 degrees, I apply a second pass over the still wet surface.
A noticeable difference between a protected painting and one that does not have a final varnish, is how water sits on its surface. A puddle forms when water is poured on an unvarnished painting, but water “beads up” (like it does on the hood of a new car) on a varnished painting.
There are other archival varnishes on the market (some even in spray cans), but this is the method that has worked well for me over the years. I hope these suggestions are helpful to you as well.